
Getting Started with Fujifilm
Key concepts of digital photography, Fujifilm camera settings and few tips and tricks. The fundamentals missing in the manuals that every photographer should understand. On Fujifilm X-S10.


My long and winding road to photography
As a kid I played with my grandfather’s 1930s bellows camera. I used positive paper (large enough, cheap and easy to get) instead of a negative, exposed it, and then developed it at home into a negative. As a student in 1980s I was editor of a national microcomputing magazine and got me a Canon AE1 to do the photographs for my articles. I was using Canon’s 1.4 50mm lens and a 70mm-200mm zoom, the latter to get good photos of computer screens. No screen dump functions at the time! I guess this is why I still do not like wide shots.
Later I traded the AE1 for an amateur Minolta and then smaller Olympus - both had autofocus - to get family and travel pictures. Then I switched to digital with Sony’s Cybershot and Canon’s Digital Ixus. In 2010 I got an iPhone 4, then a couple of Xiaomi’s and I did all my picture taking with phones. It was picture taking not photography.
In between I had a few sabbaticals from my academic career into politics. I was not taking pictures, others were photographing me. As a University professor my topic was information technology in engineering and architecture. That includes a lot of modelling, visualisation, computer graphics and even descriptive geometry. Which is about geometric ways of presenting a three dimensional object on two dimensional media. This is what photography does. And more.
I have a friend with whom we regularly discussed local politics. It got boring at some point with not really anything moving in the right direction. He is otherwise a man of the pen, but also an excellent amateur photographer. A Canon/Leica fan talked me into looking into Fujifilm. In 2023 I got me an X-S10. I am writing this almost a year and several thousands shots later.
Coming into digital photography from smartphone/laptop world is not easy. I was struggling. Perhaps you shouldn’t.
Digital cameras capture light with a sensor
Digital photo is created because the light hits the sensor. The sensor is broken into a matrix and reads the amount of red, green and blue light that did hit an element. You want as many elements as possible, because these would be translated into pixels and more pixels mean more details in the image. You want these elements to be large so that each can capture many distinct photons of light. This is why medium format (48 x 36 mm) is better than full frame (36 x 24 mm) and full frame is better than ASP-C (roughly 25 x 17 mm). However, size brings with it weight and cost. Diagonal of a full frame 35 mm sensor is 1.5x the size of ASP-C. The area of the sensor is 2.25x larger and the volume of all related components is 3.4x bigger. Theoretically, lenses for full frame would be 1.5x longer, have 1.5x bigger diameter and be 3x as heavy. Smaller is also less expensive.
But my guess is that ASP-C with 24-40 megapixels can do photos that are good enough for our eyes and for the media we amateurs will look them at. Your HD TV or mobile phone is a 2 megapixel device that will not show 24 megapixels unless you crop or zoom. 4K displays and some tablets have 12 megapixels, still a long way to go to 24. But hardware may catch up. Our eyes are estimated at 128 pixels per degree. The traditional camera has a 35mm lens on a 35mm film and an angle of view of 63 degrees. At 128 pixels per degree and 2:3 sensor this is roughly 43 megapixels. This is also a reasonable upper limit for ASP-C resolution.
Cameras will remain better than phones
Buying an ASP-C camera was decision I do not regret. It has all the advantages of a proper camera, weighs less, but still has significant advantages over mobile phones. For example the area of iPhone 15’s sensor is 48mm2, the ASP-C sensor is 370mm2, roughly 8x bigger. Individual pixel on iPhone’s 12 megapixel photo is based on sensor element 2µm wide while on Fujifilm’s X-Trans 4 sensor, each of 24 megapixels is computed based on a sensor element 4µm wide. 2x number of pixels, each 4x bigger.
Cameras also catch much more light - diameter of mobile phone lenses are up to 3mm. Diameter of an ASP-C lens is 30mm easily. Such lens captures 100x more light that hits 4x larger sensor elements to produce … an image not all that different?
If you were buying a camera you were surprised how slowly the Canons, Nikons and Fujis are rolling out new cameras. There is a new phone generation every year but a new generation of a camera every three years. Or more. Phones get better processors and do a great job at processing the less light they work with.
The bottom line is that your camera may not create a much better photo than a good phone - in well lit, far away objects. Such daytime landscapes. Or well lit very close objects. Such as that hamburger you keep posting on Instagram.
The advantages of a camera remain:
In all other conditions phones will not be able to compete with cameras, probably ever.
Cameras give you much more freedom, more choices to make, to create a photograph.
The process of making a photo on a camera is so much more fulfilling. One eye closed, the other pressed to the viewfinder, immersed in the photo, mechanical clicking of the aperture ring, the buttery movement of the focus, the sound of the shutter … phones can’t replace that.
To me, the goal to make a photo is secondary to the process of photographing. This process enhances the “being in world”, the capturing of the moment with my eyes, with my mind, with my body. A camera is a tool for that that also creates a reminder of that moment and stores it digitally. Egyptian pharaohs were buried with mummies of their cats and horsed and models and pictures of their properties. We will leave behind a USB stick with our memories.
The exposure triangle controls the amount of light
Photo is made based on the light that hits the sensor. Three parameters, only three, control that:
Shutter speed. Controls how much time, in fractions of a second, the sensor will be exposed to light. The longer the shutter is open, the more light will be there for the sensor to work with. But, the longer it is open, the more likely it is that your hands will shake or that the object that you photograph will move.
Aperture. How much light will be allowed to the lens. It is given in numbers such as f/2, f/2.8, f/4, f/5.6. F is the focal length of the lens so aperture is in fact the diameter or the hole through which light will hit the sensor. Each next number is √2 larger than the previous so the amount of light doubles as aperture goes from a higher to lower number. You can always compute how big the “hole” was by looking at the EXIF data and divide f value (millimeters) with aperture.
ISO. This is the sensitivity of the sensor. ISO 400 is 2x more “sensitive” than ISO 200. ISO was developed for film where light changed the chemistry of the film. Films with higher ISO had to have larger particles that would be affected by light so that a smaller amount of light would suffice for a chemical reaction and photos from higher ISO films would be more grainy. Sensors only have one, base sensitivity. Higher ISO is created by amplifying the electrical signal generated by light hitting the sensor. This is why photos with higher ISO get more noisy: sometimes so little light is hitting the sensor elements that two adjacent sensor elements - that should theoretically get very similar amount of light - are hit by different number of photons and when amplified the difference is large. Also possible is that the element for one color is hit and for the other is not which results in red, green or blue pixels in photos with large ISO.

No shame in using automation

If you are just starting, do not be ashamed to put your camera in AUTO mode using the mode dial. S-X10 has two auto modes:
AUTO - just set it, point and shoot.
SP - Scene Position mode - select a scene and shoot.
Make sure the camera is also focusing automatically and it will select optimal combination of all parameters. Your very first photos too will be (technically) better than what you get with your phone.
But you are reading this to go beyond point-and-shoot.
Exposure triangle is always a compromise
In principle, good pictures would be taken with fast shutter, closed aperture and low ISO. Fast shutter would forgive movement. Closed aperture would make more of a scene sharp and low ISO would reduce the noise. But unless the scene is very bright this cannot be achieved. Also, with most lenses the aperture at which they are sharpest is not the smallest one but typically somewhere in the middle of what a lens offers.
Shutter, aperture and ISO work together to make your photo brighter or darker and they can be traded one for the other. For example, increasing the aperture one stop (like going from f/2.8 to f/2.0) has the same effect to the overall exposure as halving the exposure time from 1/50th to 1/100s of a second. This is because 2.8 * 2.8 is twice as much as 2.0 * 2.0. Now you understand why lenses that allow or big apertures (like 1.4) are said to be fast (allow for faster) shutters. It makes more sense to call them brighter.
Rule of thumb used to be to set shutter to same number as focal length of a lens. So with the 50mm lens, shutter should be faster than 1/50. But this rule was for full frame. For APS-C double it. So 1/100s for 50mm.
Many Fuji cameras have IBIS (in body image stabilisation) and lenses may have OIS (optical image stabilisation). That is supposed to cover 5-6 stops, that is 5-6 halvings of exposure time. If a non stabilized photo is shot with shutter at 1/100s, with stabilization it should allow you to shoot sharp at 1/6th of a second. Theoretically.
Remember: if you do not use a tripod, keep shutter well above 1/20th. On APS-C twice f is a good rule of thumb if you are an amateur without IBIS or OIS. If you have a 50 mm lens the shutter should be at least 1/2*50=1/100.
If a photo is too dark, a lot can be saved in post processing. If photo is too noisy, this to can be to some extent to corrected. If it is blurry because the camera or the object moved, nothing can be done.
Easiest way to change exposure is with EV dial
The first manual thing to learn is to change the overall exposure, the overall brightness of the photo. The easy way to it is with the EV (exposure value) dial. The unit is f-stops. You can over or underexpose by 3-4 f-stops, that is, as if you would (keeping ISO and shutter the same) change aperture by 3-4 positions.
When would you do that? If you find the photo too light or too dark. Or the important part of the photo, like a face, not lit properly. In night photos cameras like to make the sky not black but dark grey. You can fix this by setting EV to -1 or so.
A more advanced version of the use of EV is to maximize the information (=light) captured by the camera so that you have a lot of information to work with when you would be editing the photo on a computer.
Let’s say the brightness of each pixel can have a value between 0 (as dark as possible) and 1000 (as bright as possible). If your entire photo has pixels with values between 0 and 100 you are using just 10% of the dynamic range your sensor is able to capture. The scene may be dark, but you are losing details in the different shades of darkness which no postprocessing can re-create. You can increase EV and you will be using entire dynamic range of the sensor even though the photo would be too bright. Elements that were all 0 before the increase will have values from 0-10 afterwards. Similarly, if things are 900-1000 on the bright side though this is not likely because there must be something you are shooting on that snowy, foggy landscape. Which is dark and you should not push shades of grey into black.

Histogram will tell you how many pixels there are of what color or brightness intensity. Advanced histogram view will also tell you where brightness is clipped - areas where the scene is brighter and darker than the sensor can handle. Clipping should in principle be avoided.
If you don’t plan to edit much, use EV dial to make sure the photo looks properly lit (photographers would say exposed). If you plan to edit it on a computer make it as bright as possible, but not so bright that there would be important areas of burned out whiteness - shown as black in the histogram view. We shall customize camera to have comfortable access to it later. Also, you should set display to warn you of the burnt out whites.
Changing exposure by changing elements of the triangle is easy
First I set ISO - it is likely it can stay on that position for the entire series of photos. Actually for days it is on AUTO-2. I set ISO to 160-3200. There is a dedicated button on X-S10 to set ISO.
Then there are four settings in the mode dial to do things semi-automatically.
A - aperture priority. For taking photos of things that don’t move much - landscape, portraits, street, macro, I set the camera to aperture priority. I am controlling the aperture, either on the lens or on the front dial and the rest is done automatically. I keep an eye on the shutter speed. If it is to slow I boost ISO to Auto 3.
S - shutter priority. For taking photos of moving subjects. Front dial controls the shutter and the rest is done by the camera.
P - program auto. Front dial will shift shutter and aperture.
M - manual. This is the only mode that will create photos that are very badly exposed. Because you control both shutter and aperture and ISO cannot save everything.
Badly exposed photos? You should set the camera so that it displays the photo just taken for 0.5 seconds.
The lens should bring the object in focus
Lenses are the optics through light travels to the sensor. The beauty of a proper camera is that you can change the lens and with another lens and get a whole different camera. This is to know about lenses:
Focus length is measured in mm. F determines field of view or angle that a lens would cover. 10mm are very wide, 18-24mm cover about the same angle as a human sees with both eyes at the same time. 33-70mm are often used for portraits. If you want most of the photo to be the face, you must either move closer to the face or use a longer focus length lens. If your camera is close to the face, the nose will be significantly closer to the camera then, say, the ears and will, by the rules of perspective projection, look bigger on the photo. 70mm and above are considered telephoto lenses.
Speed. What is the brightest aperture the lens can do, for example f/1.4 (f divided by 1.4, where f is, say 24 mm). Larger quotient is better and more expensive. You need lenses above f/2.8 to make the subject stand out, so that the rest is blurry. Phones can’t do that even though their speed is between 1.5 and 2.5 their focal length is between 2 and 6 millimeters. They create background blur algorithmically and it shows. To know what to blur iPhones have a built in lidar.
Optical image stabilization - OIS. Nice to have especially if the body does not have it.
Autofocus. It can be tricky to focus manually, but cheap manual focus lenses can be a lot of fun.
How to set your camera?
The choice is between manual focus MF, single autofocus AF-S and continuous autofocus AF-C. The latter is for moving subjects, dogs, sports etc. I set it to AF-S.
I set the autofocus area to spot. So that I can point to where I want both focus and exposure right, press shutter button half way, move the camera to what I want to be in the center, and press shutter all the way down.
I set face and eye tracking ON. If there are people in the photo, this is where human brain would focus, they must be sharp. It will override other focus settings.
Manual focusing is hard but not impossible
There are several tools though. If I want to be on the safe side I select a monochrome film simulation, so that the photo in the viewfinder is monochrome, and then use Contrast Peaking Highlight Red Low (low, because it is more selective at what it shows to be in focus). Then I use the RAW version of the photo.
Another trick is to set up film simulation bracketing, set the first simulation to monochrome, the second to the simulation you actually want and the third to Velvia. Just in case you like the saturated phone like photos :)
Well hidden in the manual is a setting that lets you push the focus lever and it would zoom the viewfinder so that the focusing becomes much more precise. But it is not set by default.
Also, one should check the photo quickly after it is taken and also use the focus lever to zoom in.
Confusion about the circle of confusion
You will read that there is a range of distances from the camera where the photo will be in focus. This is called depth of field (DOF). Like from 195cm to 220cm. This is in fact not true. Theoretically there is only one distance where things are in focus, lets say at 203.05cm. Then the sharpness deteriorates in both directions.
When blur is bigger than the size of “the circle of confusion” the DOF calculators will report things are not sharp. They take into account that the circle of confusion has a diameter of 0.02mm. The size of the circle of confusion is defined by the film or sensor diagonal (diagonal/1730) not by the number of megapixels. This goes back to (a) how good your eyes are and (b) that you are expected to look at the photo from a distance of f*m where f is the focal distance of the lens and m is the magnification (how many times the photo is bigger than the sensor). An alternative for (b) is that you are expected to observe a photo from a distance of 2*d where d is the diagonal of the print. For f=35mm this gives you about the same number.
However, if you are “pixel peeping”, that is zooming in at the pixels, the sharp portion would be much smaller. It is pixels (=sensor elements) that should be getting distinct information. The higher the resolution of the sensor, the smaller the “depth of perfect field” will be.
One sensor element has the size of 0.004mm which is much less than the circle of confusion. You will notice that the area of perfect sharpness is much smaller than what is reported by DOF calculators. But it may be good enough for viewing the photo from a distance.
Raw or jpeg? Both.
After focusing is done, light is measured by the camera, shutter opens, light hits the millions of sensors, shutter closes, the sensors read the light and raw data is created. It is based on these settings:
ISO
shutter speed
aperture
and dynamic range.
This last one i snot part of the exposure triangle but of the trickey of digital cameras. To increase dynamic range - the number of levels of brightness/darkness in the photo - the camera does the ISO amplification twice; as if it would take two shots, one correctly exposed and one underexposed by 1-2 stops and then combines them into one photo. Dynamic range 100% means camera does not do anything, 200% means it halves the original amplification and 400% means it does it with a quarter of original amplification.
Based on just these parameters a raw image is captured. It can be saved as such, in the format of a raw file or processed into a jpeg using so many other settings.
Phone’s camera software (Apple and Google stand out) tends to be better at processing miniscule sensor’s data and keeps mobile phones competitive in the quality of some images. However, an even better job can be done with raw processing software on a PC.
Therefore everyone recommends you set your camera to save RAW and JPEG version of every photo. Use best possible quality for JPEG, unless you will need to do a lot of wireless transfer to phone. Here, smaller files help, otherwise, memory is cheap. Ideally JPEGs are, also due to Fuji’s film simulations, the final version of your photo. If some post processing is needed or there is some really important work, you have the raw to work with. I use compressed raw format. Fuji’s lossy compressed files had compatibility issues.
Spending time with a camera or with a computer?
On film you would take a photo, have the film developed and that would be it. On digital, many people spend more time digitally tweaking the photos than taking them.
The workflow could be a whole other article. In brief: Fuji cameras, in general, do a better job at creating a jpeg than a novice could do in software. In particularly ISO noise is handled extremely well. Also, you have film recipes to add mood to the photos while shooting. No need for post processing. Aim for SOOC (straight out of camera) photos.
If you are not skipping this section and do plan to look into raw-file editors, a brief introduction.
The philosophy of raw editors if fundamentally different from the editors you were used to edit jpegs. Jpeg editors take a jpeg as input and create a new version of the jpeg as output. With each editing session the quality of the jpeg degrades. They do not save the list of instructions how to change the jpeg. They just save the jpeg.
Raw editors are non destructive. They do not change the file containing the photo, raw or jpeg. To a raw editor you would tell that there, somewhere on your disk, is a raw file that you may want to edit. It would (which I hate) or would not (which I like) make another copy of the file at a strange location of its own choosing. The editing would in fact mean creating a list of commands how to change the photo. Some raw editors (e.g. Darktable) would store a sequence of commands to be executed on a file, others would simply store what the settings for all the possible commands are. All commands would start with “no action”, followed by “develop” and then your changes. These commands/settings would be stored independently of the raw file in what is called sidecar file. It could sit next to the raw file (which I like) or somewhere out of reach (which I hate). The raw file would not be touched. When you would want to “export” the photo in jpeg or tif format, a new “picture file” would be created.
I have yet to discover a decent free raw editor for Android. On a PC, the Raw Therapee is ok for beginners, but can be slow and non-responsive. Major editors want your subscription (like Lightroom), some would let you buy a package once (like Capture One, On 1 Photo Raw and DxO Photo Lab). With a camera you probably got a free version of Capture One Express, which is decent but has been discontinued in January 2024.

My workflow is as follows:
Copy files from camera to C:/somewhere/downloads/xs10. I use Fujifilm’s PC Autosave. Works reliably once set up. Alternative is to plug the SD card into a card reader and then copy the files.
Review the photos using the free version of Narrative. It is a very efficient tool to find which the good ones are.
Move (not copy!) the good ones to folder called C:/somewhere/NewPhotos which is backed up to the cloud. Like OneDrive, Dropbox, pCloud …
Edit photos with one of the raw editors. I still need to pick the favorite one but current winner is DxO Photo Lab.
Export the edited photos to C:/somewhere/NewExports.
Move from the NewExports to permanent photo archives at C:/somewhere/PhotoArchive/. Mine is organized by year and month or topic. So I would have a folder called /PhotoArchive/2024 and a subfolder 2024/02-Brussels which would be my February trip to Brussels. Or 2024/00-Flowers for photos of flowers that year. I would rename files (using Total Commander) to YYYY-MMDD-HHMMSS of the exif date taken. This too would be backed up in the cloud.
Finally would sync this archive with GooglePhotos. Photos shot with a phone are also there. Searchable.
I am old school and want to control where photos are, in which folders, and in which files. I do not want my memories to be managed by some software that would lock me in. Thus my preference to Narrative and DxO Photo Lab. They do not want to take over the file management.
In-camera processing of the image
Camera can create JPEG or (new ones) HEIF format image files. HEIF is better, can represent more colors in a higher dynamic range, and photos take less space. But is not yet so well supported, so a social media service may not allow you to upload HEIFs. Yet.
The most essential thing the camera does in processing the image is fixing the white balance. To us, snow is white, regardless if in the sun or in the shade. To an objective sensor, snow lit by the sun directly is white, snow in the shade, lit by the blue sky, is bluish. Software does a good job fixing it. I keep this on auto except for challenging conditions such as mixed light, fireplaces and candles. Sunsets too can be tricky. Any mistakes here can be fixed in raw editing.
Fuji excelled in manufacturing great films for analogue cameras but was able to survive the destruction of the film business by digital cameras. There is a great book about this transition written by the CEO who was managing the transformation. It built film simulations into the camera - a set of rules how to process the sensor data into jpeg. This something that gives Fuji jpegs a distinct look and feel.
Film simulations are a great way to add atmosphere to a photo. Velvia for flowers, Eterna for a mature eternal city (like Rome :), Classic Chrome for a bit warmer atmosphere and that yellowish Kodak tint of American Midwest. Classic negative for the iconic greenish Fujifilm landscapes we have so many in Slovenia … You can create your own film simulations and there is a vibrant microculture around it.
But simulations don’t warrant a dial which they have on X-S10 and X-S20. Usually I would take a series of photos, perhaps whole trip, on one “film”.
Customizing the camera
An iPhone is set how it is best to be set. You can hardly customize anything. A Fujifim camera allows you to customize just about anything. Too much, in fact. X-T series has an even more obscene number of buttons and settings. And you should customize, because the defaults are not perfect. There two kinds of customizations:
Global settings. They set how the camera works. In general. Always. Main stuff you want to set globally is, in the order of importance:
Language, time, network, bluetooth, connection to phone etc. These are well covered in the manual.
Display. What information do display (LCD and viewfinder show).
Quick menu.
Buttons.
My menu.
Photography settings. Set how will camera will measure exposure and focus, how will it process and store a photo etc. etc. On X-S10 there are six banks of these settings:
one for P, A, S and M modes. They are customized together. What you set for position A is set for position S as well.
four for C1 - C4 settings. Note that each of these can also have their choice of P, A, S, M mode.
one for Auto and Scene modes. These two modes do not allow you to set much. What you can set is in the same “bank”.
Customizing global settings
Set LCD display to large. It will be less cluttered and only show essential information. Enough for a beginner.
Pushing focus button zooms. This is the only way to get manual focus lenses sharp while wide open.
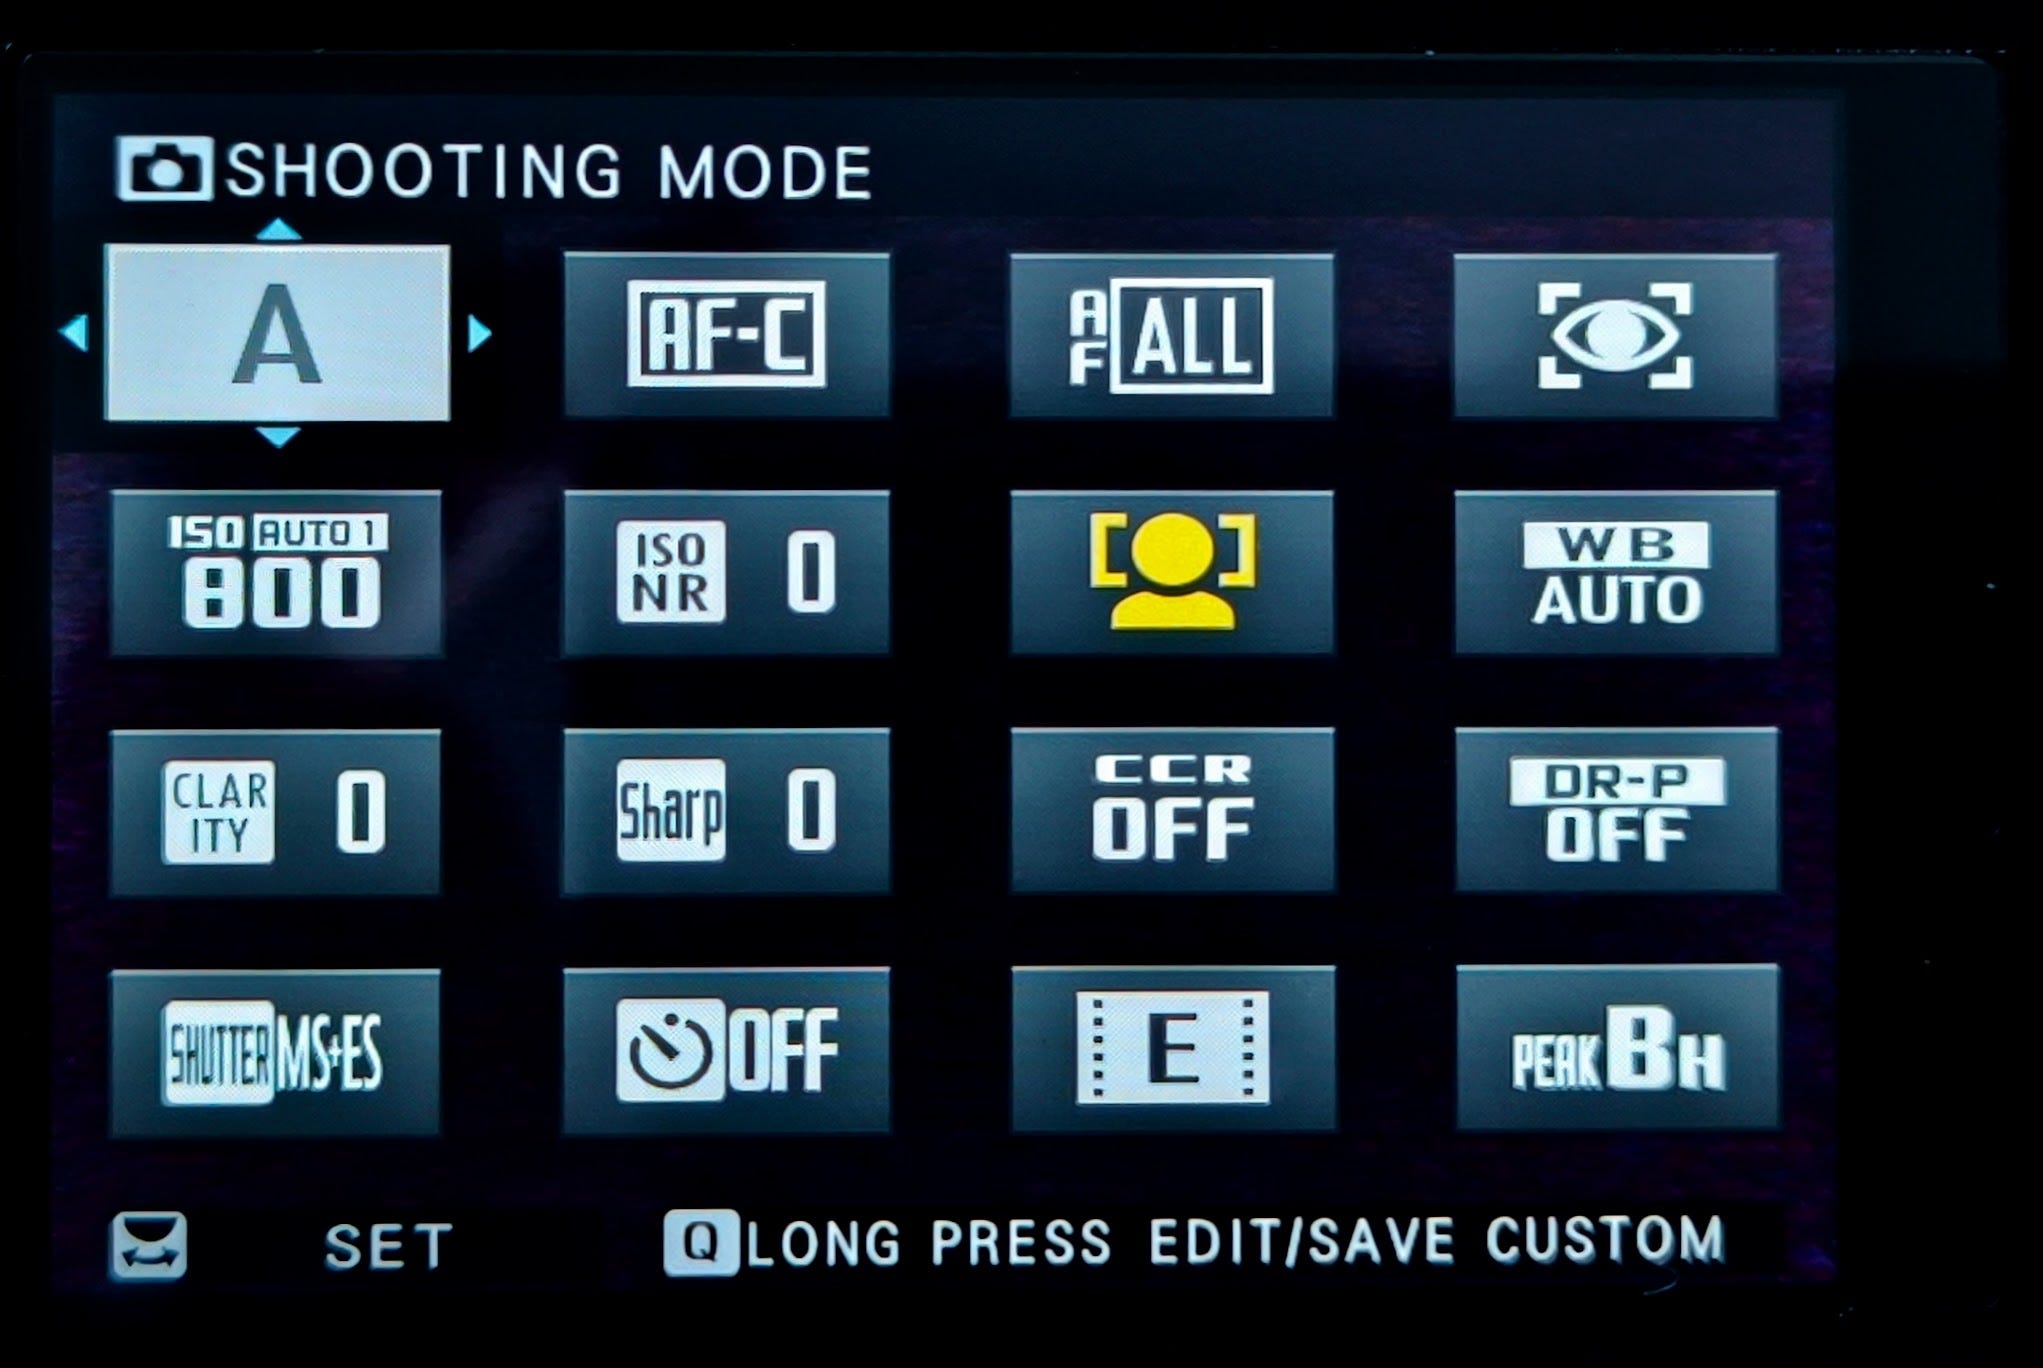
Set the Q (quick) menu: see picture above. I swipe down the LCD to open it.
Make LCD swipeable. This makes a Fuji camera a half decent device for those spoiled by mobile phones.
swipe left to show histogram and clipping;
swipe up shows horizon level;
swipe right changes focus mode;
swipe down shows q menu.
My menu. When you press menu button this menu will be displayed. Put stuff here that you need often.
Wish I could customize the display when camera is in review/display mode. Swipe left and right, next and previous photo. This works. Double tap, zoom. Great. But I would set swipe down to mark for deletion and swipe up to mark for transfer to phone/PC/cloud. This does not work. If someone from Fuji is reading this …
Default PASM settings are quite OK, but I …
use ISO AUTO 2 as default
set auto focus to S
focus to point, search faces, focus on any eye
manual focus red contrast low (high shows too much of the image in focus)
store compressed raw and large, high quality jpegs
dynamic range at AUTO
settings related to processing of the jpeg set to defaults.
PS. I would like to learn if there is a way to reset to defaults just this bank of settings.
C1, C2, C3 and C4 settings
This is where the fun happens. Like the recipes. Or a lens with a character. Play with it, explore.